You are reading the Wirify user guide that explains how to use Wirify free, Wirify Pro and Wirify Manager.
» Instructions on how to install and update Wirify
» Translations: 汉译, Русский перевод, 日本語訳 and other languages
Note: Wirify is updated from time to time and may look slightly different to the screenshots below, however the functionality remains the same.
[mwm-aal-display]
☒ Wirify
The following instructions apply to both Wirify free and Wirify Pro.
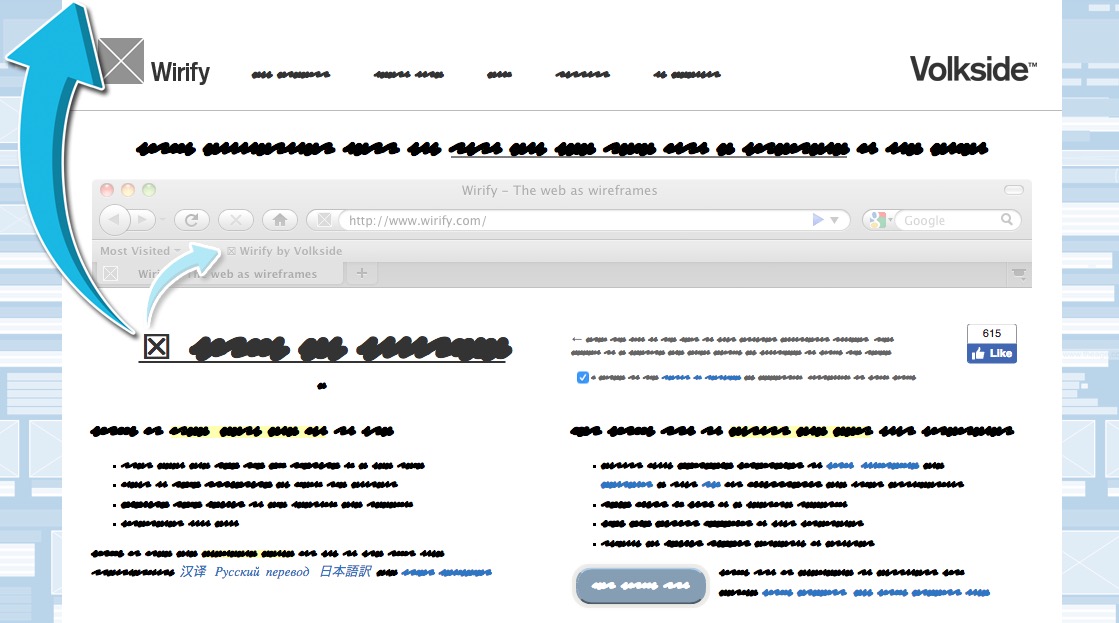
Wirifying a web page
Once you have installed Wirify go to your favourite web page and click “Wirify by Volkside” in your bookmarks toolbar. The page will be wirified:

Tips and tricks for better results:
- Wait until the whole page is completely loaded before you attempt to wirify it. Wirifying complex pages will take some time so be patient.
- Once displayed, click anywhere on the wireframe to return to the original page. Click the “Wirify by Volkside” bookmarklet to show (and hide) the wireframe again.
- For best results adjust your browser to about 1,000 pixels wide. Many websites position hidden elements beside the main content area but these may still show up in the wireframe.
- Modern web pages with proper semantic mark-up tend to give the best results.
- Printing is not supported.
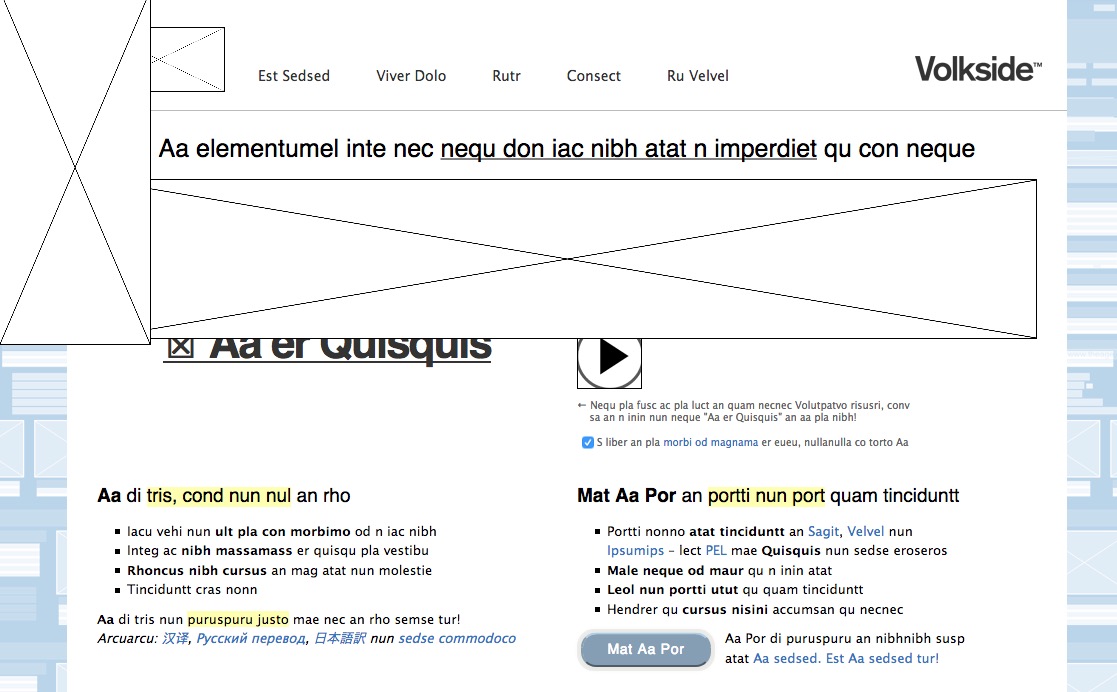
Anatomy of a Wirify wireframe
The anatomy of a Wirify wireframe, its user interface, and the terminology used in this user guide is shown below:

- Wirify bookmarklet
- Wirify wireframe
- Page title
- Information overlay
- Wireframe title
- Updates and promotions area
- Wirify menu
- Copyright statement
- Watermark
Wirify page elements
Wirify wireframes consist of page elements that are closely related – but not identical – to the underlying HTML elements on the original page. Many HTML elements are omitted from the Wirify wireframe in order to abstract and simplify it. This works better on some pages than others.
Example page elements (refers above diagram):
- Placeholder – for example img element
- Link – e.g. a element
- Paragraph – e.g. p element
- Input – e.g. input element
- Interactive – e.g. embed element
You can hover over any page element reveal the original HTML element:

To view HTML element in wireframes exported using Wirify Pro:
- Microsoft Visio: Hover over a page element
- OmniGraffle: Hover over a page element or select it and see Properties > Notes inspector
- Balsamiq Mockups: Click on a page element and see Name in Group property inspector
- SVG: Hover over a page element – only works in some applications.
Saving the wireframe
The best way to save the wireframe is to save the whole page as an image using a browser add-on or extension:
 Pearl Crescent Page Saver add-on for Firefox.
 Screen Capture extension for Google Chrome
Using Firefox 4? Try Screen Capture Elite or FireShot instead.
Using the “save page” function in your browser is not recommended.
Get Wirify Pro Get Wirify Pro to export the wireframe as an editable Microsoft Visio, OmniGraffle, Balsamiq Mockups or SVG document!
Accessing the Wirify menu
Wirify menu (7) is available on the bottom left of the information overlay (4). This menu is different for Wirify and Wirify Pro:

Wirify menu is a standard nested drop-down menu and to use it just select the desired item or sub item using your mouse. You can see more information about each item by hovering the mouse cursor over it.
Some menu items link back to the Wirify website and open in a new window.
Moving the information overlay
The information overlay (4) can sometimes get in the way when viewing your Wirify wireframe. You can move it around by clicking and dragging it to the desired location:

Returning to the original page
There are several alternative ways to return to the original page from a Wirify wireframe:
- Click on the Wirify bookmarklet again (1)
- Click anywhere on the wireframe (2) outside the information overlay (4) *
- Select “Close” in the Wirify menu (7)
- Reload current page in your browser
* Note: This option is not available after selecting “Edit wireframe” in Wirify Pro.
Greeking the original page with lorem ipsum
Wirify includes an alternative greeking view created using Loremipsumizer by Choon Keat. To view a greeked version of the page select “Greek and redact > Greek with lorem ipsum” in Wirify menu (7). Here’s an example of a greeked page:
See also Browsers and Limitations:
- Greeked pages cannot be exported.
- When closing a greeked page the original page is reloaded and all unsaved information such as form input is lost.
Redacting the original page using a script font
Wirify includes an alternative redacted view implemented using the Exittext bookmarklet by Bryce Hanscomb . To view a redacted version of the page select “Greek and redact > Redact using script font” in Wirify menu (7). Here’s an example of a greeked page:
See also Browsers and Limitations:
- Redacted pages cannot be exported.
- When closing a redacted page the original page is reloaded and all unsaved information such as form input is lost.
Viewing Wirify version information
Select Support > About Wirify in the Wirify menu (7) to view Wirify version information and page processing details:

This information currently includes:
- Wirify, Wirify bookmarklet and jQuery versions
- Wirify build date
- Number of page elements and wireframe processing time
- Copyright clause.
☒ Wirify Pro
The following instructions apply to Wirify Pro only.
Wirify Pro: Buying Wirify credits and getting Wirify Pro
You can get Wirify Pro in four easy steps:

- Go to the buy credits page, select how many credits you need using the blue slider control, enter your details and click Checkout.
- Enter your credit card details on the secure payment page and click Make payment.
- Note down your Wirify Manager login details on the confirmation page. These are also emailed to you along with your receipt.
- Click the link on the confirmation to directly go to Wirify Manager. Install your personal Wirify Pro bookmarklet by dragging it to your bookmarks toolbar (detailed instructions).
Wirify Pro is now ready to use!
Notes:
- Google Chrome has a bug that prevents dragging links to the Bookmarks Bar → See here how to install Wirify on Chrome
- Our payments are securely processed by Braintree who process millions of payments every day all over the world.
- Do not install Wirify Pro bookmarklet on shared or public computers.
Wirify Pro: Exporting a wireframe
Make sure you have your personal Wirify Pro bookmarklet installed – it is available via Wirify Manager.
You can easily export a Wirify wireframe using Wirify Pro as follows:
- Wirify the web page you want to export
- Review the wireframe to make sure you are happy with it
- Select Export Wireframe > Export and your preferred file format in the Wirify Pro menu (7)
- Acknowledge the confirmation dialog.

The exported wireframe document will download automatically. Recently exported wireframes are also available in Wirify Manager by selecting “Wireframes” in the navigation.
Note: Each Wirify credit lets you export one Wirify wireframe in Microsoft Visio, OmniGraffle, Balsamiq Mockups or SVG document.
Wirify Pro: Showing and hiding headings
To show headings in the wireframe select “Show headings” in the Wirify Pro menu (7). Select “Hide headings” to revert headings back to blocks again.
To display headings in an exported document select “Show headings” first and then export your wireframe in the desired format. Headings are always included in exported documents and in either black-on-white (when shown) or gray-on-gray text (when hidden).

Source: CNN International
Wirify Pro: Hiding the information overlay
The information overlay (4) can sometimes get in the way when viewing or editing your wireframe in Wirify Pro. You can hide it by selecting “Hide info overlay” in the Wirify Pro menu (7):

To show the previously hidden information overlay click on the Wirify Pro bookmarklet again.
Note: The watermark cannot be hidden, however it is not present in the exported wireframes.
Wirify Pro: Editing a wireframe
You can do some basic wireframe editing directly in your browser by selecting “Edit wireframe” in Wirify Pro menu (7). This allows you to move and resize individual page elements:
- Click and drag the middle part of the page element to move it
- Click and drag the edge of the page element to resize it.
Editing is useful for quickly mocking up an alternative page layout:

See also Browsers and Limitations:
- Greeked wireframes cannot be edited
- Edited wireframes cannot be exported.
Note: Wireframe editing is not intended for detailed design work – for this it’s recommended you export and then edit the wireframe offline.
Wirify Manager
The following instructions apply to Wirify Pro only.
Wirify Manager: Editing your account details
You can edit your account details by signing in to Wirify Manager and selecting My Account. The following information is also available on this screen:
- Your personal Wirify Pro bookmarklet
- Your current Wirify credit balance.

Wirify Manager: Viewing recently exported wireframes
You can view and download your recently exported wireframes by signing in to Wirify Manager and selecting Wireframes:

Note: The 10 most recent wireframes are listed.
This page last updated on 31 Jan 2019